Cannot Crop Images Smaller Than Thumbnail in WordPress Media Library
Posted on Jun 5, 2011 in WordPress | 0 comments
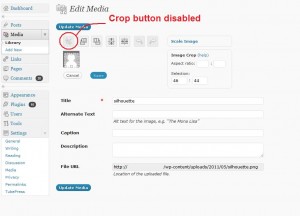
Crop Button is Disabled

Ever have this problem as a web designer? You’re doing to do a quick crop of a small image in the WordPress Media Library, so you pull it up in the Media Library, click “Edit Image,” click and drag to form the “rubber band” around the area you want to crop to… and the “crop” button is disabled.
WordPress, for some reason, doesn’t allow you to crop images smaller than the thumbnail size. If your Thumbnail image size is set at 150×150 pixels, for example, then you cannot crop an image unless the size of the rubber band is at least 150 pixels tall or 150 pixels wide.
There are several approaches to take to resolve this:
Manual Edit
That’s right. Open it on your computer in your favorite image editor (downloading it first if necessary), saving it and uploading it again. But the whole point of having the crop tool in the WordPress Media Library is to quickly make those minor alterations on the fly without needing a separate program, right?
Change Thumbnail Size
In the WordPress admin control panel, you could go to Settings > Media and then alter the dimensions for Thumbnail size images. However, you probably don’t want to make a site-wide settings change just to help you fix one image.
Hardcore Hardcoding
You could always dig through the WordPress core PHP files and fix the problem yourself… but that would take far, far more time than any of the other approaches, may cause bugs, and the next time you update WordPress the change would be lost.
Scale Up, Crop, Scale Down
This is a dirty, dirty solution, but it can be faster than making the changes locally on your computer.
- open the image in the Media Library and click the blue “Edit Image” button–just like you normally would to crop the image.
- click “scale image”
- scale the image to <strong>larger</strong> than it currently is. Let’s say, for example, that the image is 50 pixels high. Maybe you’ll decide to make it four times as large, so you change the height to 200 pixels high and click the “scale” button. Make sure to remember how many times larger you made it! Note than a red exclamation mark will appear to warn you that you are making the image larger, and it may look fuzzy.
- now the image is large enough to crop. Click and drag on the image to draw a “rubber band” around the area you want to click to.
- click the crop button
- <strong>important:</strong> click the “save image” button
- now you have to click the blue “edit image” button again
- click “scale image”
- remember how much larger you made the image? Make it that much smaller. Let’s say the cropped image from earlier is now 180 pixels tall. Since we had made it four times larger, now we will make it one-fourth the size. One-fourth is 180 is 45, so change the height to 45 pixels (the other dimension will change appropriately) and click “scale image”
- now your image is cropped and in the correct proportions again. Not a good approach at all, but it gets the job done!


