RSS Graffiti Facebook App
Posted on Jun 15, 2011 in Social Media | 0 comments
Crosspost Your Blog Posts to Facebook
The RSS Graffiti Facebook app is a great tool for any web designer–or even ordinary person–to have blog updates pushed out to your Facebook wall. In fact, you could have wall updates from any RSS feed… for example, you could have updates from a trusted source of industry news posted to your wall–but I believe the most common use would be to save you the effort of manually posting an update in multiple places.
Instructions
Go to the RSS Graffiti app (you can also search for the name of the application in Facebook).
You’ll need to add RSS Graffiti to your Facebook profile, like any other Facebook app. But then you will be presented with a new page.
Along the left-hand side you will see links for “Your Profile” and “Your Fan Pages.” This is so you can individually set up RSS Graffiti for the wall of your personal profile and for each fan page you are an admin of.
Click the name of your business Fan Page. Once you do this you will see information specific for that fan page, including the picture for that fan page, the name of the fan page, and “Status: Application Not Added” in red. Scroll down and click the blue button that says “Click here to add RSS Graffiti to this Fan Page.”
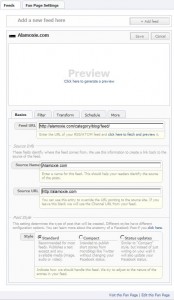
The page will change, and now you will see two tabs for that fan page: “Feeds” and “Fan Page Settings.” The “Feeds” tab is default. Click the “+ Add Feed” button.

Now the feed section is expanded; just above the preview section is a save link. Just below are even more tabs: “Basics,” “Filter,” “Transform,” “Schedule” and “More”
The “Basics” tab is the default. Configure the options here:
- Feed URL: the URL for the RSS feed. Not the URL for the website, but the URL that creates the computer-readable format. (Make sure to use the “click here to fetch and preview it” link to ensure you have the right URL!)
- Source Name: when RSS Graffiti posts to your wall, there will be a line underneath the content saying “Source:”. For example, mine is set to “Alamoxie.com,” so every post is trailed by “Source: Alamoxie.com” (This may be prefilled when you click the preview link)
- Source URL: set this to your website domain name. In my case, that is “http://alamoxie.com”
- Post Style: leave it at the default, “standard”
The default settings in the “Filter” tab are fine, unless you do not want new posts to be published ASAP to your fan page wall.
The “Transform” tab does not need any settings changed, unless you wish to add a special message to every post RSS Graffiti makes.
On the “Schedule” tab the defaults are likely fine as well; however, if you want it to check for site updates more (or less) frequently than half an hour, you can do that… but typically, half an hour should be fine. Note that even if you do change it to “as soon as possible,” that does not mean instantaneous; it will often be at least a few minutes before the new post is made.
The defaults in the “More” tab are fine.
Click the “save” button above the preview section.
It’s as easy as that! The next time you publish a blog post, give it some time, then check to ensure that the post was published to the wall of your fan page.


