


Using the Collision Testimonials Plugin
Posted on Nov 14, 2010 in WordPress | 2 comments
“Collision Testimonials” is one good plugin of many for managing Testimonials.
Pros:
- Allows you to specify HTML markup before and after each testimonial (so you can, for example, put each testimonial in blockquotes)
- Provides a “random testimonial” sidebar widget, or you can show the entire list of testimonials in a page
Cons:
- No differentiation between the testimonials in the sidebar and on the full page–if you have a large testimonial on your testimonial page, it would show as a long testimonial in the sidebar–there isn’t an option to just give an excerpt in the sidebar.
Prerequisites for Following These Instructions
- The “Collision Testimonials” WordPress Plugin must be installed
- The plugin must be activated
- You need to be logged in to the admin panel for your website
- Basic familiarity with the WordPress administrative panel
Adding Testimonials
Go to the new “Testimonials” menu in your admin page, as seen below.
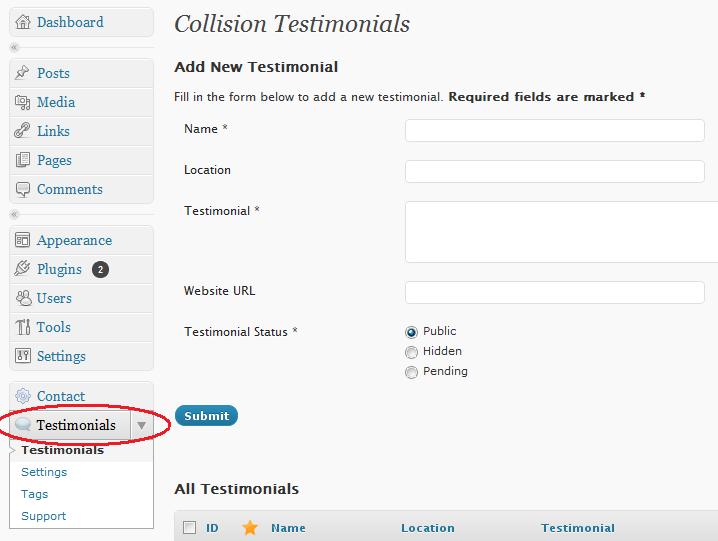
Simply fill in the indicated fields for:
- the name of the person giving the testimonial
- the location of the person giving the testimonial–this could be a city name or a company name
- the testimonial text itself. If you are intending to use these testimonials in the sidebar, the text should be fairly short here.
- the website URL is completely optional–if the person giving the testimonial is representing their business, link to their company there
- For the “Testimonial Status,” “Public” means it will show with your other testimonials in the sidebar or page. “Hidden” or “Pending” will keep it private and not showing on the webpage.
Then click “Submit” and your testimonial is added to the list lower down on the screen.
Managing Testimonials
Want to edit, delete, or hide a testimonial?
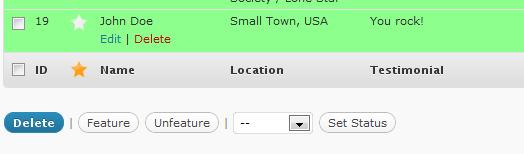
On the same screen as before (Testimonials > Testimonials), you can manipulate the existing testimonials in various ways.
When you hover over one of the rows of testimonials, the “edit” and “delete” links (shown in the image above) will appear. If you click “edit,” then you will be able to change the name, location, testimonial text and so on.
You can also mark the checkboxes for as many of the testimonials as you like, then click the drop-down menu. You may then select “Public” or “Hidden” from that menu and click the “Set Status” button to show those specific testimonials on the website or hide them, respectively.
Tip: This is handy for when you want to see how a specific testimonial looks in the randomly rotating sidebar widget—just hide all testimonials except the one you want to see.
Changing Collision Testimonials Settings
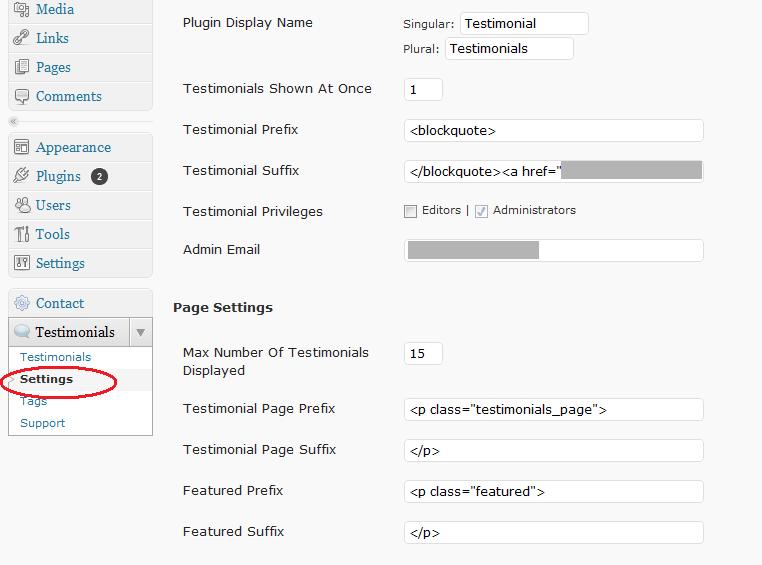
Most likely you will not want to change anything on this screen–except for the number of testimonials displayed–unless you are familiar with HTML and know what you are doing.
In that case, you will find this useful, as this is where you can specify HTML to be entered before and after each testimonial (“Testimonial Prefix” and “Testimonial Suffix”) or, when all the testimonials are shown in a page, the HTML to be entered before and after the list. Bear in mind that the Textimonial Prefix and Suffix apply whether the testimonial is in the sidebar widget or on a page, so you may have unexpected results if you are displaying the testimonials in both places.
Adding Testimonial List to Your Pages
The Testimonials > Tags page has codes you can use to show the entire list of testimonials on a given page. Some require you to manually edit PHP files. The simpler method they show is:
<!-- collision_testimonials_page --> - This tag allows you to create a testimonials page where all your testimonials are displayed. In order to use this tag, just edit the page or post where you want your testimonials displayed (use the WordPress Editor), then switch to HTML view, and paste the tag in where you'd like the testimonials to be displayed.
Thanks for the info. Having some issues with the installation of the plugin.
I’m sorry to hear that, Eryn. Perhaps I need to update the post with tips on that. Or you can try posting to the WordPress Plugins support forum.