


Sending Confirmation Emails with a Google Docs Form
Posted on Jun 18, 2011 in Tech Tips & Tricks | 246 comments

I love Google Apps. Gmail, Google Docs, Google Voice–all brilliant, indispensable products in my opinion. Being able to create forms in Google Docs for quick polls and surveys is also very handy, but the extremely limited feature set has been frustrating to me. One surprising lack is that of being able to send a confirmation email to the user. Granted, not all forms necessarily even have a field for the user to enter their email.
[Original post 6/18/11. Edited 10/29/11 to add HTML email to the example. Edited 4/21/12 to add more screenshots and correct “Triggers menu” to “Resources menu”.]
With a quick script, you can rectify this and customize an email that will be sent to the user. Don’t be intimidated by the code–if you can handle writing raw HTML, you will be able to modify this script to suit your needs.
However, if you’ve never used a Google Form before, you probably want to play around with that and get comfortable with that first. The rest of this assumes that you have created a form and are viewing the attached spreadsheet.
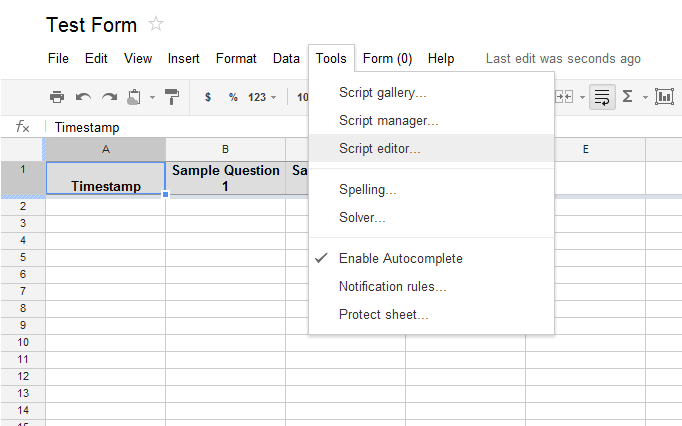
The first step, in Google Docs, is to click on “Tools” and then “Script Editor.” A new window will open, with an empty function called “myFunction.” Overwrite the contents of this window with the code you want to use. Below I’ve added a complete example that you can rework to your needs.
function onFormSubmit(e) {
var timestamp = e.values[0];
var yourName = e.values[1];
var toAddress = e.values[2];
var eventName = e.values[3];
var visitDate = e.values[4];
var visitComments = e.values[5];
var subject = "CAP Confirmation - " + eventName + " " + visitDate;
var emailBody = "Thank you for your Club Ambassador Program report submitted on " + timestamp +
"\n\nThe details you entered were as follows: " +
"\nYour Name: " + yourName +
"\nYour Email: " + toAddress +
"\nClub or Event Name: " + eventName +
"\nVisit Date: " + visitDate +
"\nVisit Comments: " + visitComments;
var htmlBody = "Thank you for your <b>Club Ambassador Program</b> report submitted on <i>" + timestamp +
"</i><br/> <br/>The details you entered were as follows: " +
"<br/><font color=\"red\">Your Name:</font> " + yourName +
"<br/>Your Email: " + toAddress;
var optAdvancedArgs = {name: "Club Ambassador Program", htmlBody: htmlBody};
MailApp.sendEmail(toAddress, subject,
emailBody, optAdvancedArgs);
}
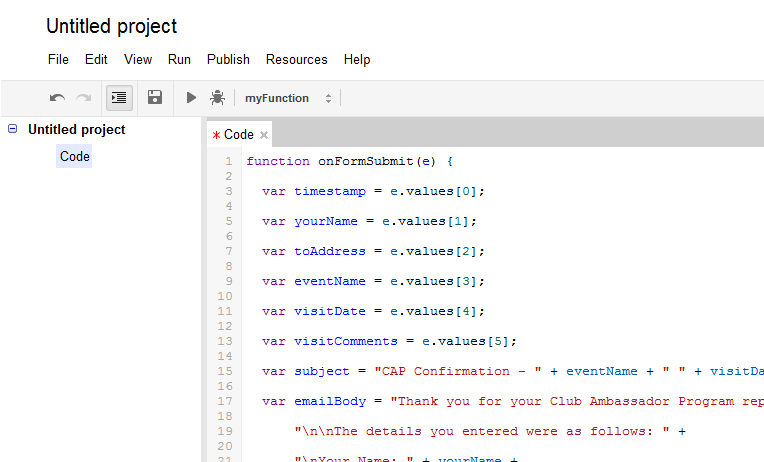
See the first section, with “e.values”? Those refer to the form fields. “e.values[0]” will always be the timestamp. “e.values[1]” will be the first field in your form, and so on.
Feel free to change the variable names. If the first form field isn’t the respondent’s name, but is actually their favorite color instead, you can certainly change it from yourName to faveColor. Just make sure to change all occurrences of the identifier.
If you have fewer form fields, remove the lines you don’t need. If you have more, copy and paste the existing lines, making sure to increment the numbers… so “e.values[27]” would be the 27th form field, and so on. You do not need to reference every form field in your script–just have lines for the ones you want to include in the email.
Next, we put together some strings (a string of words) to be put into the email. If the text is in quotation marks, it will appear just like you entered it. If the text is not in quotation marks, then it refers to one of the variables we just set up. Plus signs concatenate those strings, and every line needs to end in a semicolon.
“\n” is special. In quotation marks, this refers to a newline character… a line break. Add that whenever you would press “enter” in the email if you were writing it by hand.
Modify the “subject” line as necessary. Yours might be simpler or more complex.
Modify the body section as necessary. This was broken up into multiple lines just for readability. It could all be on one line. Just make sure to have plus signs to connects different strings of text, and only to have one semicolon (at the end).
The “optAdvancedArgs” section is special. It refers to special settings (anything beyond the basic to, subject and body settings) for an email. You don’t have to use it. You can simply remove that, changing that line to:
 MailApp.sendEmail(toAddress, subject,

                   emailBody);
Want to set other advanced arguments, like a cc line, an HTML body for the email and more? View the MailApp Script Reference and scroll to the bottom of the page for a list of what you can set and examples of how to use them.
- If you provide an HTML version of the email, also provide plain text for those email clients that can’t see the HTML version.
- Emails don’t work like web pages. Writing HTML for an email is like making a website in the 90’s. Read the linked article or do some Googling to find out what tags you should and shouldn’t use.
- Email clients tend to be narrow. Don’t count on having much horizontal space.
- When you are writing a Google Docs script and need to refer to a quote character, such as when writing attributes in an HTML tag, use a backslash before the single or double quote, or else Google Docs will think you’re ending the string. Check the example for when a font color is added to “your name”
Modify the script, and then save it. However, there is one more important step to take to get this to work!

In the script editing window (not the normal Google Docs window), click on the “Resources” menu. Click “Current Script’s Triggers…” and then “Add a new trigger.”
The first field should be “onFormSubmit,” the second “From Spreadsheet” and the third “On form submit.” Change these if necessary and add the trigger. You will need to give your approval for Google to allow the form to send emails.
There! Now try submitting a form and make sure the email looks the way you want.
TypeError: Cannot read property “values” from undefined. (line 2, file “Code”)
function onFormSubmit(e) {
var timestamp = e.values[0];
var terminos = e.values[1];
var apellido1 = e.values[2];
var apellido2 = e.values[3];
var nombre = e.values[4];
var edad = e.values[7];
var sexo = e.values[8];
var celular = e.values[15];
var mail = e.values[16];
var padre = e.values[17];
// The subject of the email
var subject = “Email de Confirmación de: ” + nombre + apellido1 + apellido2;
// emailBody is for those devices that can’t render HTML, is plain text
var emailBody = “Gracias por registrarte en Borinquen Coqui ” + timestamp +
“\n\nLos detalles de su registro son: ” +
“\nNombre: ” + nombre + apellido1 + apellido2 +
“\nTerminos: ” + terminos +
“\nEdad al 1 de septiembre 2017: ” + edad +
“\nSexo: ” + sexo +
“\nCelular: ” + celular +
“\nPadre: ” + padre;
// html is for those devices that can render HTML
// nowadays almost all devices can render HTML
var htmlBody = “Gracias por su registro en el Club de Voleibol Borinquen Coquí el: ” + timestamp +
“Los detalles de su registro son: ” +
“Nombre: ” + nombre + apellido1 + apellido2 + “” +
“Términos: ” + terminos +
“Edad al 1 de septiembre del 2016: ” + edad +
“Genero: ” + sexo +
“Tel: ” + celular +
“Email: ” + mail +
“Padre: ” + padre;
// More info for Advanced Options Parameters
// https://developers.google.com/apps-script/reference/mail/mail-app#sendEmail(String,String,String,Object)
var advancedOpts = { name: “Formulario – Borinquen Coqui”, htmlBody: htmlBody,};
// This instruction sends the email
MailApp.sendEmail(mail, subject, emailBody, advancedOpts);
}
Hello. Please, consider using our professional SEO services to bring traffic and conversions to your website:
– SEO audit
– Keyword Research
– Creating content specifications
– On-page SEO
– Link building campaign
We have 5+ years of experience and more than 30+successful projects behind our back.
If you are interested in using one or more our services, or full complex, please, confirm the request to find out more.
Hello! You can use our professional web design services to improve your online business and website conversions. 8+ years of successful work, reasonable pricing. Please, confirm the request to find out more.
Hello! May be you need help in website development? We can help you. We are web development team with 8+ years of experience. Our portfolio has projects starting from simple one-pagers to complex e-commerce solutions with an intricate back-end logic. Please, confirm the request to find out more.